Prerequisites: Futurama Web Tutorial 3.
Minimum Futurama Version to be used: 3.2
Learning goal: In this Tutorial we will continue with the previous tutorial. To our website a couple of DropDownLists, a new object, will be added representing the day, month and year of the date. The months we will add to the list manually for they are always the same. The days will be modelled dynamically, because they depend on the month that is chosen (and the days of February also on the year). For the years we will take the coming ten years. For this we will make use of a Range.
- Click here for the example of Tutorial 1. Save the contents of the ZIP-file (i.e. the directory "HelloWorld" plus it’s contents) in the main Futurama directory and rename the directory "HelloWorld" to "Dropdownlists". Of course you can also do the tutorial and save the result in a new directory "Dropdownlists".
- Open the Editor.
- Open the calc.xml in the directory "Dropdownlists".
- Rename the Document to "Dropdownlists".
- Change the property PageTitle to "Dropdownlists".
- Change the property Text of the WebLabel 'Text' also to 'Dropdownlists'.
We will now start with adding three DropDownList objects.
- Select the WebPanel 'centre', do a rightclick in the Design Window and select New » DropDownList.
- Name the DropDownList 'Day', this will be the place on the website where a day can be selected.
- Analogously create two more DropDownLists and name these 'Month' and 'Year'.
We will add the months of the year to the DrowDownList by means of a set of WebLabels.
- Create in the DrowDownList 'Month' twelve WebLabels and name each of them after a month.
- Set the property Text of each Weblabel to it’s respective name.
The Editor should now look like below:
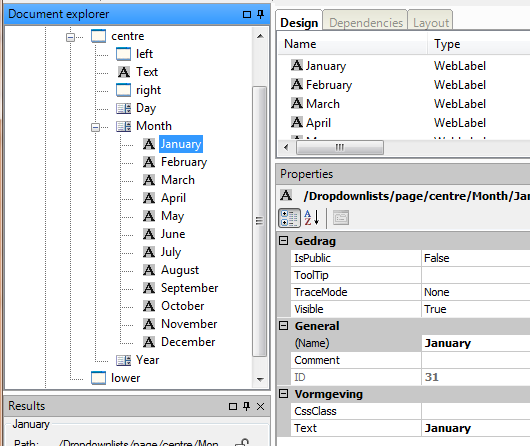
- Save the Futurama Document and open it in a Webbrowser. Verify that the months are indeed visible in the centre DropDownList and that the outer DropDownlists are still empty.
Next we will need to fill the other two DropDownLists. Because of the nature of the day and year we need to fill them dynamically. Therefore we will create a new Node containing the data which will be shown in de DropDownLists. In this Node we will also put the Uservariables. As a reminder: a UserVariable is an object the value of which is not determined upon creating. The value of a UserVariable is determined during runtime by the user of the website. In our case it is determined when the user selects a value in one of the DropDownlists 'Day', 'Month' or 'Year'.
- Create in the Document 'Dropdownlists' a Node and name it 'Data'.
- Create in the Node 'Data' three UserVariables with New » UserVariable.
- Name the three UserVariables 'Day', 'Month' and 'Year'. The type remains long.
- At the DropDownList 'Day' create for the property UserVariable a Reference to the Uservariable 'Day'.
- Repeat the above for the the DropDownLists 'Month' and 'Year' and their respective UserVariables.
When a month is selected from the list, the Uservariable 'Month' is assigned the rownumber of this month. The first row ('January') has rownumber 0, 'February' number 1 etc.). This value will be used to determine which days will be shown in the DropDownList 'Day'. For reasons of convenience we determine this in a separate Node 'Support'.
- In the Node 'Data' create another Node and name it 'Support'.
First we make a Formula that, using the value of the UserVariable 'Month', returns the number of days in that month. For reason of convenience we ignore February 29 in leap years.
- Create in 'Support' a Formula 'Number of days' of type long.
- Select the Formula Logical » If long.
- Create in Logical_test a Formula and select Logical » IsEqual boolean where argument1 and argument2 are integers.
- Define at Number1 a Reference to the UserVariable 'Month'.
- Define at Number2 a Fixed with value 1 (which is the month of February). Click on OK.
- Define at Value_if_true a Fixed with value 28.
- Define at Value_if_false a Formula and select Logical » If long once more.
- Create in Logical_test a Formula and select Logical » Or boolean.
- At Logical1 create a Formula and select Logical » IsEqual boolean where argument1 and argument2 are integers.
- Define at Number1 a Reference to the UserVariable 'Month'.
- Define at Number2 a Fixed with value 3 (which is the month of april). Click on OK.
- Copy the Formula at Logical1 to Logical2 and change the value to 5 (indicating June).
- Copy the Formula at Logical1 to Logical3 and change the value to 8 (indicating September).
- Copy the Formula at Logical1 to Logical4 and change the value to 10 (indicating november). Click on OK.
- Set Value_if_true to 30 and Value_if_false to 31. Click on OK twice.
The screen should now look like below:
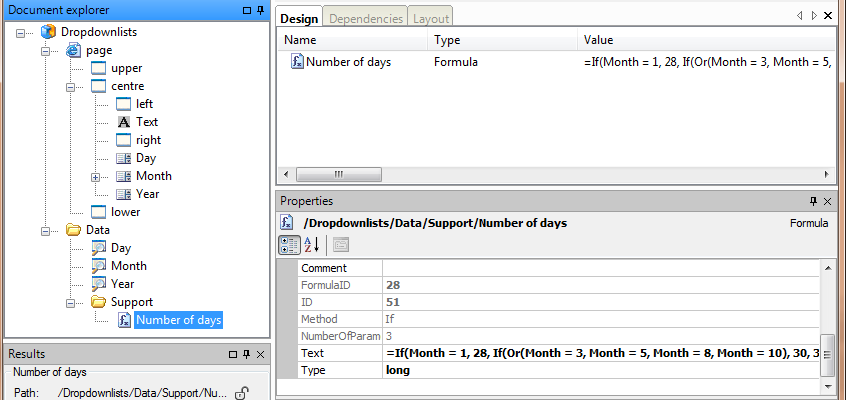
Because the value of 'Month' equals 0, 'Number of days' should return the value 31 in the Result Window. The next step is to make a dynamic Table in which the first element is 1 and the last element is the value of 'Number of days'. For this we make use of a Range. A Range is a row of numbers or dates with a predetermined stepsize between each element of the row.
- Create in the Node 'Support' a Range through New » Range.
- Name the Range 'Days' and leave the type as long.
- Open the property Text.
- Give 'From' the value 1.
- Define at 'To' a Reference to 'Number of days'.
- Give 'Step' the value 1 and click on OK.
In the Result Window there should now be a Table containing a column with the values from 1 to 31.
Now we will connect the Range 'Days' to the DropDownList 'Day'. To accomplish this we will make use of the properties 'RepeatData' and 'RepeatTarget' of the DropDownList. 'RepeatData' will contain a Reference to 'Days'. The values from this Range will then be assigned to 'RepeatTarget' in consecutive order. 'RepeatTarget' therefore has to be a UserVariable. This UserVariable will be assigned the values of 'RepeatData' one by one. With the aid of a WebLabel in the DropDownList with a Reference to this UserVariable the values can be displayed. For the programmers among us; in programming terms this is called a For-loop e.g. For i = 1 to 10. 'RepeatTarget' is then i and 'RepeatData' is 1 to 10.
- Define at the property 'RepeatData' of the DropDownList 'Day' a Reference to the Range 'Days'.
Next we have to make a new UserVariable that can serve as the 'RepeatTarget'.
- Define in the Node 'Support' a UserVariable of type long and name this one 'Index'.
- Define at the property 'RepeatTarget' of the DropDownList 'Day' a Reference to 'Index'.
Finally we have to define a WebLabel inside the DropDownList 'Day' to actually show the days. This WebLabel will have a Reference to 'Index'. When 'Index' is assigned the values of the Range 'Days' during the execution of the loop, the days are shown in the DropDownList.
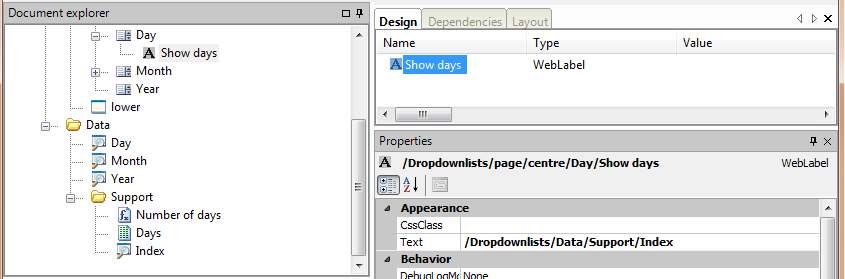
- Create in the DropDownList 'Day' a WebLabel and name it 'Show days'.
- Define at the property Text of 'Show days' a Reference to 'Index' in the Node 'Support'.
The Editor should now look as below:
Now save the Document and open the document in a webbrowser. We can now see the numbers 1 to 31 in the left DropDownList. Unfortunately this list is not updated when another month is selected. This is because the property AutoPostBack of the DropDownList 'Month' is still False. Because of this, the page and therefore the DropDownLists are not refreshed.
- Turn on the property AutoPostBack of DropDownList 'Month' to True.
- Save the document once again and open it in the webbrowser.
- Verify that when selecting a month the correct number of days appears in the left DropDownList.
Analogously to the days, we make a Range for 'Year' containing the years for the coming decade, starting with the currect year.
- Create in the Node 'Support' a Range, name the Range 'Years' and leave the type as long.
- Open the property Text.
- Create in 'From' a Formula and select Date and Time » Year long.
- Create at the argument Date a Formula and select Date and Time » Now date. Click on OK twice.
- Define at 'To' a Formula and select Math » Add long. Click on OK to return
- Copy the Formula at 'From' and open the Formula at 'To'.
- At Number1 select Paste.
- At Number2 create a Fixed with value 10. Click on OK.
- Give 'Step' the value 1 and click on OK.
- Verify in the Result Window dat a list of 11 years has appeared starting with the current year.
Analogously to the DropDownList 'Day' we also have to use the properties 'RepeatData' and 'RepeatTarget' to get our years into the DropDownList. We also have to make a WebLabel. We don’t have to create a new UserVariable comparable to 'Index', however, for we can reuse 'Index' here.
- Copy 'Show days' of DropDownList 'Day' to 'Year' and rename it to 'Show years'.
- Define at the property 'RepeatData' of the DropDownList 'Year' a Reference to the Range 'Years'.
- Define at the property 'RepeatTarget' of the DropDownList 'Year' a Reference to 'Index'.
We finally have to make sure that our screen not only gets refreshed when a month is selected but also when we select a day and a year.
- Turn the property AutoPostBack of DropDownLists 'Day' and 'Year' also to True.
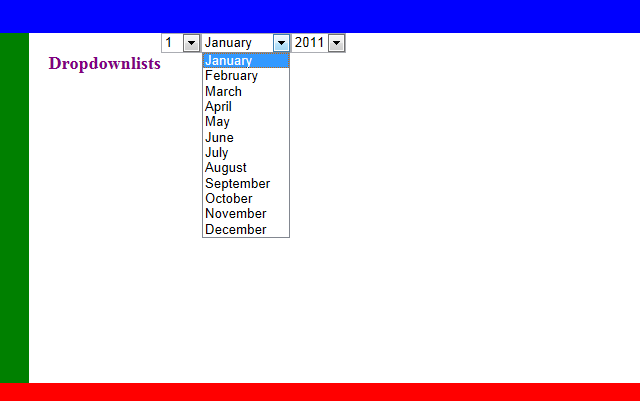
Save the document and open it into a webbrowser. The screen should now look as follows:
Now we want to show the complete date in a WebLabel, analogously to Futurama Web Oefening 3.
- Create in the Node 'Data' a new Formula 'Date' of type date.
- Select Date and Time » Date date.
The year has to be looked up in the Range 'Years' based on the value of the UserVariable 'Year'. For this we use the Formula Index to retrieve the value of a certain row out of a Range (or Table for that matter).
- At the argument Year create a Formula and select Table » Index long.
- At the argument Table define a Reference to the Range 'Years'.
- At Row define a Reference to the UserVariable 'Year'.
- Leave the argument Column at 0. Click on OK.
For the month we can make use of the value of the UserVariable 'Month', but it has to be raised by 1, for the value of this UserVariable ranges from 0 till 11.
- Create at the argument 'Month' a Formula and choose Math » Add long.
- At Number1 create a Reference to the UserVariable 'Month'
- At Number2 create a Fixed with value 1.
To determine the day we use a similar method:
- Copy the Formula at the argument 'Month' and paste it at the argument 'Day'.
- Change the Reference to the UserVariable 'Month' into a Reference to the UserVariable 'Day'.
In order to show the date on screen we have to add a WebLabel:
- In the node 'centre' create a new WebLabel and give it the name 'Date'.
- Give the WebLabel CssClass "weblabel".
- Create at the property Text a Formula and select Text » FormatDate string.
- Create at the argument Date a Reference to 'Date' in the node 'Data'.
- At the argument Format enter the text "MMMM d, yyyy".
- Manoeuver the WebPanel 'right' below WebLabel 'Date'.
The Editor should now look like below:

Now we have to make sure the screen looks good by using the stylesheet.
- Open in the Windows Explorer the file content.css and add the following text. Save the file afterwards.
.dropdownlist
{
float:left;
margin-top:20px;
text-align:center;
margin-left:10px;
}

.day
{
width:40px;
}

.month
{
width:100px;
}

.year
{
width:60px;
}
- Now give the DropDownLists 'Day', 'Month' and 'Year' the CssClasses "dropdownlist day", "dropdownlist month" and "dropdownlist year" respectively.
Save the Document and open it in any webbrowser. The screen should now show the following:

Experiment with different values for day, month and year to verify that the correct date is shown.
A complete example of this exercise can be downloaded here: DropDownLists. Note that this example is created in version 3.2 of Futurama. Opening this example in a newer version of Futurama will prompt Futurama to update the example to the newer version. Click OK when this message appears.