Prerequisites: Futurama Web Tutorial 1.
Minimum Futurama Version to be used: 3.2
Learning goal: In this tutorial we’ll continue with Tutorial 1. We will add a couple of objects to our website, in particular two Buttons each of which will execute a certain Action. The action will be to change the color of one of the WebPanels.
Click here for the example of Tutorial 1. Save the contents of the ZIP-file (i.e. the directory "HelloWorld" plus it’s contents) in the main Futurama directory and rename the directory "HelloWorld" to "Buttons". Off course you can also do the tutorial and save the result in a new directory "Buttons".
- Open the Editor.
- Open with File » Open or the button
 the file calc.xml in the directory "Buttons".
- Rename the Document to "Buttons".
- Change the property PageTitle to "Buttons" as well.
- Change the property Text of the WebLabel 'Text' to 'Buttons'.
We will now add first an objectof type Button.
- Select the WebPanel 'centre', do a rightclick in the Design Window and select New » Button.
- Give the Button the name 'Color webpanels black'.
- Give the property Text the value "Color webpanels black".
This text will later on be shown in the website underlined to indicate it is a button. The mousepointer will automatically adapt the 'hand-with-indexfinger'-shape.
- Give the property CssClass the value "button".
The class 'button' is not yet present in our file content.css and has therefore to be added.
- Open in the Windows Explorer in de directory "Buttons" the file content.css. This can be done in any editor e.g. NotePad, Word, Visual Studio, JEdit etc.
- Add the following text to the file and save it.
.button {
float:left;
margin-left:20px;
margin-top:20px;
}
- Manoeuvre the Button between the objects 'Text' and 'right'.
Next we would like that somethings actually happens after pressing on the Button. In Futurama we can make use of the Action object to define events that are executed when the action is triggered, for example by pressing a button. In our case we simply want to change the color of the green side panels into black.
- Select the Button, do a rightclick in the Design Window and select New » Action. This Action will only be executed when the button is pressed.
- Give the Action the name 'Color left panel black'.
The Action has to do 'something' to the WebPanel 'left', namely changing it’s color. The 'Target object' of any Action can be defined in the property 'TargetControl'.
- At the property click on the button
 and define a Reference to the WebPanel 'left'.
Now we still have to define whát we want to happen. We would like the WebPanel to turn black when the Action is executed. The present color green is determined in the CssClass 'centreleft' of the WebPanel. What we want to accomplish is therefore that when the Action is executed the CssClass changes. Instead of taking the CssClass with color green, it should take the CssClass with color black.
- Create in the Action a Fixed of type string and name it 'CssClass'.
The Fixed has to have this name for it has to be the same as the name of the property 'CssClass' of the WebPanel that needs to be changed.
When using the Action object to alter properties of other objects make sure the names are exactly identical (including capitals).
- Give the property Text of the Fixed 'CssClass' the value "centreleftblack".
This is a class that does not yet exist and therefore has to be added to the content.css. Open this file, add the following text and save it.
.centreleftblack {
height:350px;
background-color:Black;
width:50px;
float:left;
}
Notice that this class differs only from 'centreleft' in terms of the value of background-color. Now we only have to declare a similar Action for WebPanel 'right'.
- Copy the Action 'Color left panel black' and paste it under the same button.
- Change its name to 'Color right panel black'.
- Adapt the Reference at the property 'TargetControl' in such a way that it refers to WebPanel 'right'.
- Change the property Text of the Fixed 'CssClass' into the name of the new class "centrerightblack".
- Add this class to content.css by adding the following text:
.centrerightblack {
height:350px;
background-color:Black;
width:50px;
float:right;
}
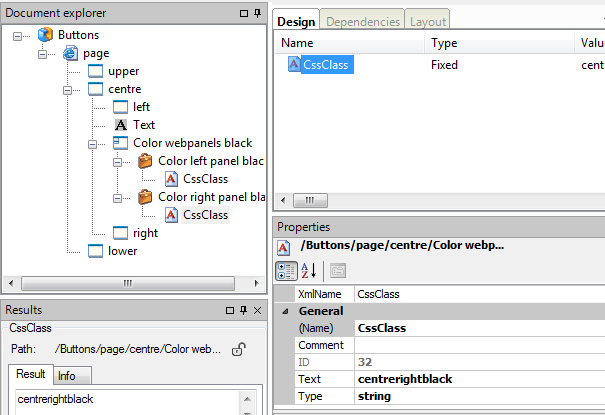
The Editor should now look like the one below.
To return the original color of the WebPanels we'll add another Button. To save time we'll copy/paste the existing button and alter the copy.
- Copy the Button 'Color webpanels black' and paste it in WebPanel 'centre'.
- Change the name of the Button to 'Color webpanels green'.
- Change in the property Text 'black' to 'green'.
- Change in the names of the underlying Actions also 'black' to 'green'. The respective TargetControls don’t have to be adjusted for they are already correct.
- The Fixed 'CssClass' with Text "centreleftblack" needs to get the Text "centreleft", which is the current value of the property CssClass of WebPanel 'left'.
- The Fixed 'CssClass' with Text "centrerightblack" needs to get the Text "centreright", wich is the current value of the property CssClass of WebPanel 'right'.
- Finally manoeuvre the new Button between the first Button and WebPanel 'right'.
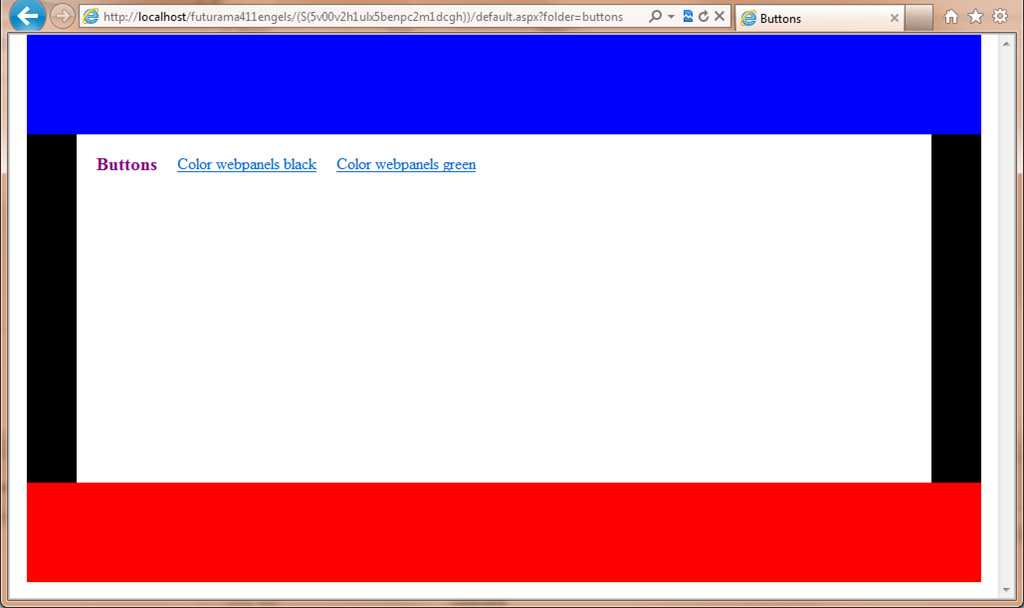
Now we would like to see and test the result.
- Save the document.
- Open the Internet Explorer or another webbrowser and type the following URL 'http://localhost/futurama/default.aspx?folder=Buttons'. Here "localhost/futurama" and "Buttons" are the name and location of the Futurama directory. In your organization the name and/or location can differ. Ask your system administrator for assistence.
The screen should now look like the one below. Verify that the WebPanels change color when you click on the buttons. You can further experiment by altering the Background-color in content.css to get other colors.
For reasons of readability and understandability the CSS used in this Tutorial is a bit more expanded than would be the case in practice. For example in this Tutorial every object has it’s own CssClass, which implies many double defined properties. See for example the classes 'centreleft', 'centreright', 'centreleftblack' and 'centrerightblack', which differ only in the property background-color. In practice we would have made one class for the width and height, which would be used by all WebPanels. In addition there would be four CssClasses containing the float and background-color property.
A complete example of this exercise can be downloaded here: Buttons. Note that this example is created in version 3.2 of Futurama. Opening this example in a newer version of Futurama will prompt Futurama to update the example to the newer version. Click OK when this message appears.