Prerequisites: Futurama Editor Tutorial 1, Futurama Editor Tutorial 2 and Futurama Editor Tutorial 3. Knowledge of the theory behind the calculation of pensions is helpfull, though not strictly necessary. For this we refer to the literature.
Minimum Futurama Version to be used: 3.2
Learning goal: In this exercise we’ll model a (limited) defined benefit pension plan. Note that it is based on the Dutch pensionsystem and may not be similar to other countries. The following topics will be adressed:
- A number of Fixed parameters will be defined, among which the pension accrual rate, early retirement reduction factors etc. For the latter a DataTable will be used.
- We’ll model a number of needed input parameters, like the salary, the parttime percentage, the benefit computation base, the “AOW” (a basic state pension for people aged 65 and over which is paid for by the government) and a number of dates. These will be modelled as Fixeds for the time being. In real-life applications users of a pension planner website will be able to set such dates, according to their individual desires.
- The accruing of old age pension is modelled, based on an average pay regulation. Here we’ll work intensively with tables.
- We will model three choices into the pension plan: changing the parttime percentage (i.e. a user elects to work more or less at some point in the future), early retirement and a construction called Variable Pension, where a user can select to have his old age pension increased for a number of years after which the old age pension will be decreased for the rest of his lifespan.
- For the salary we’ll create a formula with a date as argument. When we enter any date in this formula, it will return the salary at that specific date. If we then use a table with dates as input, we can obtain a table with the accompanying salary for every date. Both these tables could be used to show in a graph or table on the website. The latter will not be tackled in this exercise however. For the old age pension and the constant “AOW” we’ll make similar formulas.
Without further ado, let’s begin!
- In the Windows Explorer create in the Futurama directory a new directory called "Pensionplan". This is the directory where our project will be stored.
- Open the Futurama Editor.
- Create a new document and give it the name 'Pensionplan'.
- Save this document as "calc.xml" in the directory "Pensionplan".
- In the Design window do a right-click. Select New » Node. Rename the node 'Calculation'.
- Define in the Node 'Calculation' eight Nodes with the respective names 'Fixed parameters', 'Dates', 'Durations', 'Userdata', 'Salary', 'AOW', 'OAP' (i.e. Old Age Pension) and 'Export' (to the website for instance).
A. Fixed parameters
In this Node we will put the annual accrual rate of the old age pension, the early retirement reduction factors and the factors that belong to the Variable Pension construction.
- Define in the 'Fixed parameters' a Fixed named 'Annual accrual rate' of type double and assign it value 0,02.
- Define a DataTable named 'Early retirement reduction factors' of type double.
- Click on the Text property and set Column Count to 12 (12 months) and Row Count to 11.
The factors themselves will be imported from an Excel file. In reality most of the time the factors will allready be available in Excel and it saves us from typing everything.
- Download this Excelsheet here.
- Select the top block of values (everything inside the borders) and copy the values.
- In the Editor select in the Define DataTable window the cell with name 'Index'.
- Click on the button "Paste from Excel" at the lower right.
The values will appear in the Table. These are the early retirement reduction factors for every age between 55 years and 0 months and 65 years and 0 months. Note that "Paste from Excel" only works if the dimensions of the selected block in Excel are equal to the ones in the DataTable. Else an error will occur.
- Define analogously a DataTable 'Variable pension factors' of type double. Set Column Count to 2 and Row Count to 16.
- Copy from the Excelsheet the bottom block of values and use "Paste from Excel" to get it into the DataTable.
In the property Comment we will put some extra information about these factors, namely that they can be used to calculate a higher pension for a duration of 10 years only.
- Type in the property Comment the following text “10 years high, then low”.
B. Dates
In this Node we’ll put several dates like the date of birth, the date when the AOW starts (which is at the age of 65), the date on which the user starts to work parttime etc. We will also create formulas that determine the duration between two dates and formulas that determine the age of the user on a certain date. In a real pensionplanner these dates will off course not be Fixeds, but will be read from either a database or be determined by choices that the user makes in the planner.
- Define the following Fixeds:
| Name |
Type |
Value |
Comment |
| Birthdate |
date |
jan 22, 1950 |
|
| System date |
date |
jan 1, 2009 |
this is the date belonging to the accrued pensionrights that are read into the planner from out of the system (e.g. database) |
| Parttime date |
date |
april 1, 2010 |
date when the user want to start working parttime |
| Retirement date |
date |
jan 1, 2014 |
date when the user wants to retire |
| AOW date |
date |
jan 1, 2015 |
date when the user turns 65 and receives his AOW |
| Variable pension date low |
date |
jan 1, 2024 |
is equal to the 'Retirement date' + 10 years |
| Fictive date of decease |
date |
jan 1, 2030 |
is needed for determining durations |
| Current parttimepercentage |
double |
1 |
100% a.k.a. fulltime |
| Chosen parttimepercentage |
double |
0.8 |
chosen parttimepercentage is 80% |
Next we are going to make a Formula that determines the duration in years between a startdate and enddate. Because a formula like this is used often, we will use arguments representing the startdate and enddate. We will make a simple formula that determines the duration as simply the number of years between two dates plus the number of months, divided by 12.
- Define a Formula of type double named 'Duration'. Choose Math » Add double.
- Add two arguments: 'startdate' and 'enddate', both of type date.
- Define for Number1 a Formula and choose Math » Subtract double.
- Define for Number1 a Formula and choose Date and Time » Year long.
- Select for Date the argument 'enddate'. Click on OK.
- Define for Number2 a Formula and choose again for Date and Time » Year long.
- Select for Date the argument 'startdate'. Click on OK twice.
- Define for Number2 a Formula and select Math » Divide double.
- Define for Numerator a Formula and choose Math » Subtract double.
- Define for Number1 a Formula and choose Date and Time » Month long.
- Select for Date the argument 'enddate'. Click on OK.
- Define for Number2 a Formula and choose again Date and Time » Month long.
- Select for Date the argument 'startdate'. Click on OK twice.
- Define for Denominator a Fixed with value 12. Click on OK. The screen should now look as below:
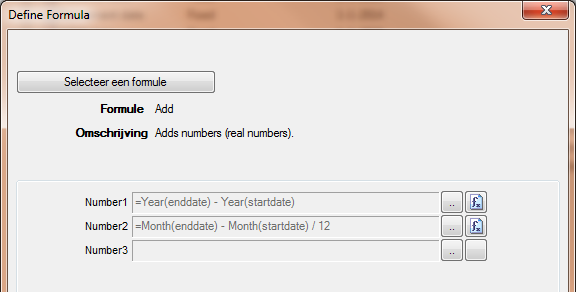
We shall now test our formula. Verify that the duration between January 1 2006 and February 12 2010 equals 4,08333 year a.k.a. 4 years and 1 month.
Finally we’ll make two formulas which, given a startdate and enddate, gives the year-part and month-part of the age respectively.
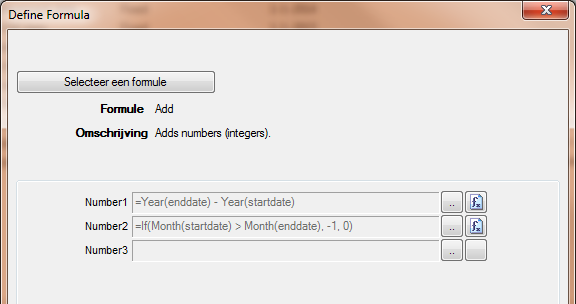
- Definee a Formula of type long named 'AgeYear'.
- Add two arguments: 'startdate' and 'enddate', both of type date.
- Next choose Math » Add long.
- Number1 becomes a Formula, choose Math » Subtract long.
- Number1 becomes a Formula, choose Date and Time » Year long.
- Select for Date the argument 'enddate'. Click on OK.
- Copy the Formula at Number1 to Number2, open the latter and change Date to the argument 'startdate'. Click on OK twice.
- Number2 becomes a Formula, choose Logical » If long.
- Logical-test becomes a Formula, select here Logical » IsGreat boolean.
A choice can now be made out of three "flavours". If one hovers over the different possibilities in the top of the Define Formula window a description can be seen. Choose the flavour with the description "True if argument1 > argument2 (integers)".
- Number1 becomes a Formula, choose Date and Time » Month long.
- Select for Date the argument 'startdate'. Click on OK.
- Copy the Formula at Number1 to Number2, open the latter and change Date to the argument 'enddate'. Click on OK twice.
- Define for Value_if_true a Fixed with value -1 and for Value_if_false a Fixed with value 0. The screen should now look like below. Click on OK twice to close the screen.
- Copy the Formula 'AgeYear' and rename the copy to 'AgeMonth'.
- Change the formula of Number1 the Formulas Year() by Date and Time » Month long. The argumenten will remain the same which is good.
- Replace in the Formula of Number2 the value –1 by 12. The result should now look as follows:

Verify that when startdate is May 15 1954 and enddate is April 1 2016, the age at that date is 61 years and 11 months.
C. Durations
In this Node several calculations will be performed on the dates. First we’re going to join them in a single table. Then we’ll sort this table chronologically and finally split them into a table BeginDates and a table EndDates. We can then determine the duration between consecutive dates with the aid of the Formula 'Duration' we created in B. Dates.
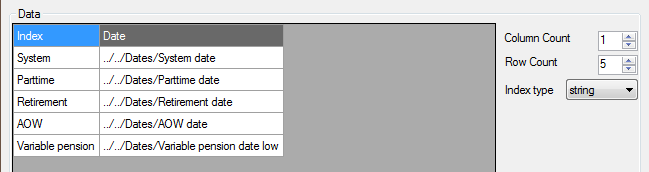
- Define a DataTable of type date and name it 'Dates'.
- Set Column Count to 1 and Row Count to 5.
- Fill the table as indicated in the screenshot below. The values in the column 'Date' are all References to the respective dates in B. Dates. Note that the Fictive date of decease is not included. This one will be added later.
We are now going to determine the duration between the dates in table 'Dates'. "On paper" or in Excel the calculation would be as follows. Notation is in dd-MM-yyyy
| Begindate |
Enddate |
Duration in years |
| 1-1-2009 |
1-4-2010 |
1,25 |
| 1-4-2010 |
1-1-2014 |
3,75 |
| 1-1-2014 |
1-1-2015 |
1 |
| 1-1-2015 |
1-1-2024 |
9 |
| 1-1-2024 |
1-1-2030 |
6 |
What we have to do here is adding a new table 'EndDates' that contains the same dates as the table 'Dates', but with all dates moved up one row. We then can make use of our created formula 'Duration' with the two tables as arguments. The result will then be a table containing all durations in consecutive order. We see, however, that if we move all dates one row up, we’re going to miss a date in de last cell of 'EndDates'. In fact, we should put here the actual date of death for the user, but since we can’t know it, we’ll make the assumption that the date of death is at age 80. This is exactly the 'Fictive date of decease'.
- Define in the node 'Durations' a Formula and call this one 'BeginDates'.
- Select the Formula Table » Sort date.
- For the argument Table, define a Reference to 'Dates'.
- Leave Column at 0, for we have only one column.
- Set Remove_duplicate and Remove_empty_r to True. These settings make sure we have a table with unique dates in chronological order. Click on OK. Verify that the result is a table with the same values as in 'Dates'.
- Define a Formula of type date and name it 'EndDates'.
- Select the Formula Tabel » Sort date.
- Define for Table a Formula and select Table » Replace date.
We are going to replace the earliest date with 'Fictive date of decease'.
- Define for Table a Reference to 'BeginDates'.
- Define for Old_value a Formula and choose Table » Min date.
- Define for Table a Reference to 'BeginDates' and leave Column at 0. Cllick on OK.
- Define for New_value a Reference to 'Fictive date of decease' in the Node 'Dates'. Click on OK.
- Leave Column at 0 and set Remove_duplicate and Remove_empty_r to True again.
With tables 'BeginDates' and 'EndDates' as arguments we can now determine the duration between every pair of consecutive dates.
- Define a Reference, rename it 'Duration' and make the reference point to the Formula 'Duration' in the Node 'Dates'.
- Define for argument 'startdate' a Reference to 'BeginDates'.
- Define for argument 'enddate' a Reference to 'EndDates'. Click on OK.
In the Results Window the following table should be shown now. Verify that indeed these are the correct durations.

D. Userdata
In this Node we will house some userdata, such as the salary and the currently accrued old age pension. In real life planners these data is often read from a back-office system such as a database or XML file, although it is also possible that the user has to enter his data manually.
- Define a Fixed labeled 'Accrued Old Age Pension' of type double with value 5187,97. We assume this is the amount op pension at the system date of 1-1-2009.
- Define a Fixed labeled 'Fulltime salary' of type double with value 26002,48.
- Define a Fixed labeled 'AOW' of type double with value 8725,68.
- Define a Fixed labeled 'Benefit computation base' of type double with value 13175,48.
E. Salary
In this Node we pull place Formulas for the fulltime and parttime salary. When creating these Formulas we’ll make use of an argument 'date'. The result of the Formulas is then the (fulltime or parttime) salary at any given date. We will first create a Formula dat states that the salary is only positive for dates between the system date and the retirement date. Otherwise the salary equals 0. In other words: we get only paid till the date of retirement. In formula-form we can state this as follows:
=If(And(date >= System date, date < Retirement date), Fulltime salary, 0)
We will now build this formula in Futurama.
- Define a Formula of type double labeled 'Salary (Fulltime)'.
- First we define an argument. Click on the button
 at the property "Arguments" and add an argument 'date' of type date.
- Select at the property Text the Formula Logical » If double.
- Define at Logical_test a Formula and select here Logical » And boolean.
- Define at Logical1 a Formula and select Logical » IsGreaterEqual boolean, where argument1 and argument2 are dates.
- Select at Date1 the argument 'date'.
- Define at Date2 a Reference to 'System date' in the Node 'Dates' and click OK.
- Define at Logical2 another Formula and select Logical » IsLess boolean, where argument1 and argument2 are dates.
- Select at Date1 the argument 'date'.
- Define at Date2 a Reference to 'Retirement date' in the Node 'Dates' and click on OK twice.
- Define at Value_if_true a Reference to 'Fulltime salary' in the Node 'Userdata'. Value_if_false remains 0. Click OK.
The formula gives as result either 0 or the fulltime salary depending on the value of date. In the Results Window the formula can be tested. In the tab Arguments fill in a number of dates, before 1-1-2009 as well as after 1-1-2014 as well as in between and view the result in the tab Result. For convenience mark the option 'auto' checked.
The following step is to create a Formula that returns the parttimepercentage on any date.
- Define a Formula of type double named 'Parttime Percentage'. Add an argument 'date' of type date.
- Select at the property Text the Formula Logical » If double.
- Define at Logical_test a Formula and select here Logical » IsGreaterEqual boolean, where argument1 and argument2 are dates.
- Select at Date1 the argument 'date'.
- Define at Date2 a Reference to 'Retirement date' in the Node 'Dates' and click OK.
- Define at Value_if_true a Fixed with value 0. This indicates that someone does not work after his retirement date, which means a percentage of 0.
- Define at Value_if_false a Formula and select Logical » If double.
- Define at Logical_test a Formula and select here Logical » IsGreaterEqual boolean, where argument1 and argument2 are dates.
- Select at Date1 the argument 'date'.
- Define at Date2 a Reference to 'Parttime date' in the Node 'Dates' and click on OK.
- Define at Value_if_true a Reference to 'Chosen parttimepercentage'. This indicates that someone will work with this chosen percentage after the date on which he has chosen to start working parttime.
- Define at Value_if_false a Reference to 'Current parttimepercentage'. This indicates that someone will work with his present percentage till the date on which he has chosen to start working parttime. Click on OK twice.
With the aid of both Formulas we’ve created we’re going to make a Formula for the parttime salary.
- Define a Formula of type double named 'Salary (Parttime)' and add an argument 'date' of type date.
- Select at the property Text the Formula Math » Multiply double.
- Define at Number1 a Reference to 'Parttime Percentage'
- Clik at the argument 'date' on
 and select Argument » date. Click on OK.
- Define at Number2 a Reference to 'Salary (Fulltime)' and select Argument » date once again. Click on OK twice.
What remains is to make a Formula for the Benefit computation base. This formula is in essence similar to the one for the fulltime salary: the Benefit computation base is only positive for dates between the system date and the retirement date. Otherwise the Benefit computation base equals 0.
- Copy the Formula 'Salary (Fulltime)' and rename the copy to 'Benefit computation base (Fulltime)'.
- Open the Formula and define at Value_if_true a Reference to 'Benefit computation base' in the Node 'Userdata'. Click on OK.
F. AOW
In this Node we will put the Formula that returns the “AOW” (the basic state pension for people aged 65 and over) at any date, analogues to the Formula for the salary. It is quite straightforward that the value will be 0 if the date is before the date on which the user turns 65 and equal to the (predefined) AOW-amount if the date equals or is beyond this date.
- Copy the Formula 'Parttime Percentage' to the Node 'AOW' and rename the copy to 'AOW payments'.
- Click on
 at the property 'Text' and then on
  at Logical_test.
- Click on
 at Date2 and define a Reference to 'AOW date' instead of 'Retirement date'. Click on OK.
- Define at Value_if_true a Reference to 'AOW' in de Node 'UserData'.
- Define at Value_if_false a Fixed with value 0. Click on OK.
The Formula returns, depending on the given date, either 0 or the AOW-amount. In the Results Window we can test de formula. In the tabblad Arguments fill in a couple of dates, before and after January 1 2015 and verify the results in the tab Result.
G. OAP
In this Node we will put the calculations of the accumulation of pension benefits as well as the calculations for the choices for early retirement and a variable pension. For these calculations we will make extensive use of the Fixeds and Formulas in the previous Nodes.
- In the Node 'OAP' create four Nodes and name these successively 'System date', 'Accrual of pension', 'Retirement date' and 'Variable pension'.
- In the Node 'System date' we will simply put the accrued pension as given. In Futurama applications that are linked to back office systems this accrued pension can be retrieved from the system as well as the accompanying system date.
- Define in the Node 'System date' a Reference to 'Accrued Old Age Pension' in the Node 'Userdata'.
- Rename the Reference 'OAP on system date'.
Accrual of pension
In the Node 'Accrual of pension' we’ll put the formulas representing the accrual of pension. The method employed here is based on a Defined Benefit system. In this system every year of the users participation a part of the pension is accrued. The annual accruement in any year is determined by a fixed percentage of the 'Benefit computation base, corrected for the parttime percentage.
- Create in the Node 'Accrual of pension' a Formula of type double and name this one 'Accrual of pension'. Choose for Math » Multiply double.
- Define for Number1 a Reference to the Fixed 'Annual accrual rate' in the Node 'Fixed parameters'.
- Define for Number2 a Reference to the Fixed 'Benefit computation base (Fulltime)' in the Node 'Salary'.
- Define for argument date a Reference to 'BeginDates' in the Node 'Durations'.
- Define for Number3 a Reference to 'Parttime Percentage' in the Node 'Salary'.
- Define for argument date again a Reference to 'BeginDates' in the Node 'Durations'.
- Define for Number4 a Reference to 'Duration' in the Node 'Durations'. Click on OK.
In the Results Window the following table should appear now, containing the accrual in the consecutive periods:
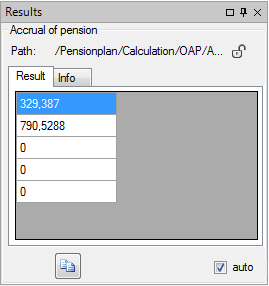
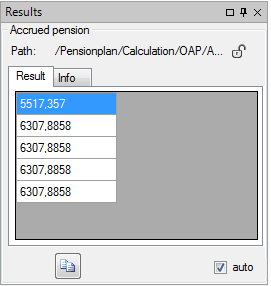
Now that we know the accrual in each period we make a table with the cumulative accrual. We then can determine at any date how much pension has been accrued till that date.
- Create in the Node 'Accrual of pension' a Formula of type double and name this one 'Accrued pension'. Choose for Math » Add double.
- Define at Number1 a Reference to 'OAP on system date' in the Node 'System date'.
- Define at Number2 a Formula and select Table » Cumulative double.
- Define at Table a Reference to 'Accrual of pension'. Click on OK twice.
In the Results Window the following table should appear:
Retirement
Every row in this table indicates the total accrued pension at the respective dates in the table 'EndDates'. We are now going to use this table when retrieving the accrued pension on the date of retirement.
- Create in the Node 'Retirement date' a Formula of type long and rename this to 'Index'.
With this Formula the index of the row in the table 'EndDates' containing the date of retirement will be determined. If we take a look at this table we can verify that this is the second row. This row has index 1 for the first row has index 0.
- Select the Formule Table » FindRow long. Choose the variant with the description "Returns the exact row number of a reference (date).".
- Define at Table a Reference to 'EndDates' in the Node 'Durations'.
- Define at Lookup_value a Reference to 'Retirement date' in the Node 'Dates'. Click on OK and verify that the result is indeed 1.
- Define a new Formula of type double and rename this to 'Accrued OAP'.
- Select the formula Table » Index double.
- Define at Table a Reference to 'Accrued pension' in the node 'Accrual of pension'.
- Define at Row a Reference to 'Index' and define Column as a Fixed with value 0. Click on OK.
Verify that the Result is 6307,8858. This is the accrued pension at the retirement date January 1 2014. These have to be reduced by the early retirement reduction factor which belongs to the age of the user at the early retirement date.
- Create a Reference named 'Retirement Age Year' to 'AgeYear' which is in the Node 'Dates'.
- Define at startdate a Reference to 'Birthdate' and at enddate a Reference to 'Retirement date', both are in the Node 'Dates'. Verify that the Result is 64.
- Similarly create a Reference named 'Retirement Age Month' to 'AgeMonth'.
- Define at startdate a Reference to 'Birthdate' and at enddate a Reference to 'Retirement date'. Verify that the Result is 0.
With the aid of 'AgeYear' en 'AgeMonth' we can lookup the correct factor in the table containing the factors:
- Define a Formula of type double and call this Formula 'Early retirement reduction factor'.
- Select the formula Table » VLookUP double. Choose the variant with the following line as part of it’s description at the top of the window: "Looks for a value (integer) in the leftmost column of a table…".
- Define at Lookup_value a Reference to 'Retirement Age Year' and at Column a Reference to 'Retirement Age Month'.
- Define at Table a Reference to the table 'Early retirement reduction factors' in the Node 'Fixed parameters'.
Verify that the result of this Lookup function is 0,919. To be absolutely certain, you can also verify that this factor is correct in the table itself. By double-clicking on the table in the Dependencies-window you can “jump” easily to the table.
- Now define a Formula of type double and call this Formula 'OAP after reduction'.
- Select Math » Multiply double.
- Define at Number1 a Reference to 'Accrued OAP' and at Number2 a Reference to 'Early retirement reduction factor'. Click on OK.
We now know what the pensionrights are after reduction at the age of 64. Verify that these are 5796,947.
Variable pension
Another option in this simplified pensionscheme for the user is to choose for a variable pension. Here we assume that this means that after retirement, the user can choose to raise his pension for a number of years after which his pension will be decreased for the rest of his life. This construction will be modelled in the Node 'Variable pension'. We implement a 'high' period of ten years.
- Define in the Node 'Variable pension' a Reference to 'OAP after reduction' and call this Reference 'OAP before variation'.
- Define a Formula of type double and call this 'Factor High'.
- Select once more the formula Table » VLookUP double. Choose the variant with the following line as part of it’s description at the top of the window: "Looks for a value (integer) in the leftmost column of a table…".
- Define at Lookup_value a Reference to 'Retirement Age Year' and let Column remain 0.
- Define at Table a Reference to the table 'Variable pension factors' in the Node 'Fixed parameters'.
- Copy and Paste 'Factor High' and name the copy 'Factor Low'.
- Change in this Formula the value of Column from 0 to 1. Click on OK.
- Define a Formula of type double and call it 'OAP High'.
- Select Math » Multiply double.
- Define at Number1 a Reference to 'OAP before variation' and at Number2 a Reference to 'Factor High'. Click on OK.
- Copy and Paste the Formula 'OAP High' and name it 'OAP Low'.
- Redefine the Reference at Number2 to 'Factor Low'. Click on OK.
Payments formula
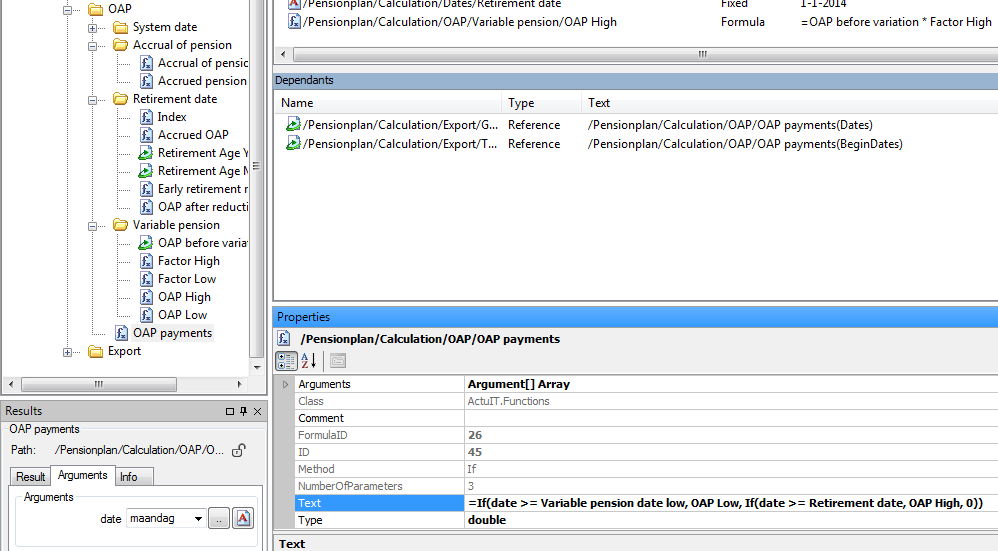
With all calculations firmly in place, we finally have to combine them all into a single Formula that represents the payments of the pension. It is straightforward that the pension is 0 before the retirement date. After that the pension is equal to 'OAP High' for ten years, which means until 'Variable pension date low'. After that the pension is equal to 'OAP Low' till the end (literally).
- Define in the Node 'OAP' a Formula of type double and call it 'OAP payments'.
- Add an argument: 'date' of type date.
- Select at the property Text for the formula Logical » If double.
- Define at Logical_test a Formula and select Logical » IsGreaterEqual boolean where “argument1 >= argument2 (dates)”.
- Select at Date1 the argument 'date'.
- Define at Date2 a Reference to 'Variable pension date low' in the Node 'Dates' and click on OK.
- Define at Value_if_true a Reference to 'OAP Low' in the Node 'Variable pension'.
- Define at Value_if_false a Formula and select Logical » If double.
- Define at Logical_test a Formula and select Logical » IsGreaterEqual boolean where “argument1 >= argument2 (dates)”.
- Select at Date1 the argument 'date'.
- Define at Date2 a Reference to 'Retirement date' in the Node 'Dates' and click on OK.
- Define at Value_if_true a Reference to 'OAP High' in the Node 'Variable pension'. Value_if_false will remain 0. Click on OK twice.
The screen should now look as follows. Verify that the Formula for the OAP payments is correct as well.
H. Export
In this Node we will create the tables containing the dates, ages, salaries, parttime percentages, old age pension etc. These can be used to construct tables and graphs on a website. The actual showing on screen can be modelled perfectly in Futurama, but lies beyond the scope of this tutorial.
First we will create one Node for data to be used in graphs and one Node for data to be used in tables. Why these are slightly different will become clear later on.
- Create in the Node 'Export' a Node called 'Graph' and a Node called 'Table'.
Graph
First we make a table with dates for the graph. Because a graph needs an endpoint we will make use of 'Fictive date of decease' once more.
- Copy from the 'Duratons' the Table 'Dates' to the Node 'Graph'.
- Increase the Row Count with 1 to make it 6.
- Call the sixth element 'Death (Fictive)'.
- Define in the column 'Date' a Reference to 'Fictive date of decease' in the Node 'Dates'. Click on OK.
Now we will make tables for the data that we want to show in the graph. These are the pension, the salary and the AOW. We will create these by making a reference to the several Formulas and use the table with dates as input.
- Define a Reference to 'OAP payments' in the Node 'OAP'. Define at the argument date a Reference to 'Dates'. Call the Reference simply 'OAP'.
- Define a Reference to 'Salary (Parttime)' in the Node 'Salary'. Define at the argument date a Reference to 'Dates'. Call the Reference 'Salary'.
- Define a Reference to 'AOW payments' in the Node 'AOW'. Define at the argument date a Reference to 'Dates'. Call the Reference 'AOW'.
Table
In the Node 'Table' we will put the data that will be shown in a table. We want our table to look like the one below.
| From |
1-1-2009 |
1-4-2010 |
1-1-2014 |
1-1-2015 |
1-1-2024 |
| Tot |
1-4-2010 |
1-1-2014 |
1-1-2015 |
1-1-2024 |
† |
| Parttime % |
|
|
|
|
|
| Salary |
|
|
|
|
|
| AOW |
|
|
|
|
|
| Pension |
|
|
|
|
|
| Total |
|
|
|
|
|
What we need for the dates are the tables 'BeginDates' and 'EndDates' in the Node 'Durations'. In a later stadium we will have to replace 'Fictive date of decease' by the sign †. This will not be done in this tutorial however.
- Define a Reference to 'BeginDates' in the Node 'Durations' and call this one also 'BeginDates'.
- Define a Reference to 'EndDates' in the Node 'Durations' and likewise call this one also 'EndDates'.
Now we will make tables for every row in the table using 'BeginDates'. Note that in the table we don’t need an endpoint, unlike the graph.
- Define a Reference to 'OAP payments' in the Node 'OAP'. Define at the argument date a Reference to 'BeginDates'. Call the Reference 'OAP'.
- Define a Reference to 'Salary (Parttime)' in the Node 'Salary'. Define at the argument date a Reference to 'BeginDates'. Call the Reference 'Salary'.
- Define a Reference to 'AOW payments' in the Node 'AOW'. Define at the argument date a Reference to 'BeginDates'. Call the Reference 'AOW'.
- Define a Reference to 'Parttime Percentage' in the Node 'Salary'. Define at the argument date a Reference to 'BeginDates'. Call the Reference 'PT percentage'.
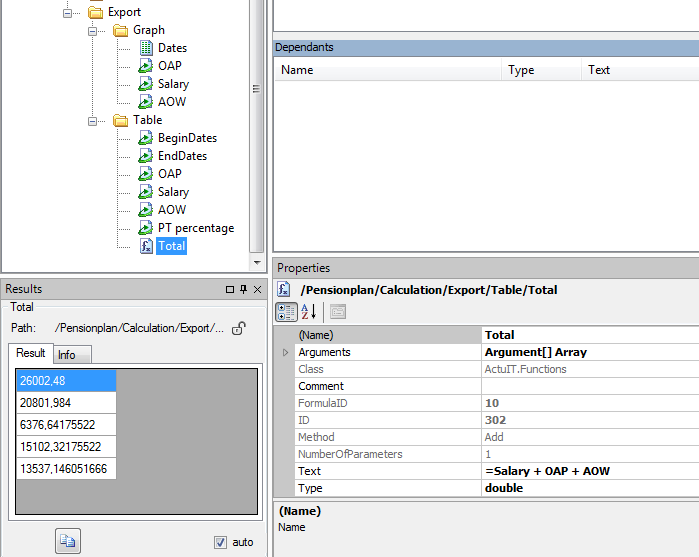
- Define a Formula of type double, call it 'Total' and select Math » Add double.
- Define at Number1, Number2 and Number3 References to 'Salary', 'OAP' and 'AOW' respectively. Click on OK.
In the Futurama Editor we should now look as below:
In this tutorial we have modelled a simplified Defined Benefit pensionscheme and looked exclusively at the formulas involved. In a real life application we would have to expand it greatly for a system with predefined dates is not very useful. Besides, it will need a graphical user interface where the user can make choices and see the results.
A complete example of this exercise can be downloaded here: Pensionplan. Note that this example is created in version 3.2 of Futurama. Opening this example in a newer version of Futurama will prompt Futurama to update the example to the newer version. Click OK when this message appears.