Prerequisites: None, although some knowledge of CSS is recommendable.
Minimum Futurama Version to be used: 3.2
Learning goal: In this exercise the first website will be created in Futurama. We will get acquainted with sevelal specific windows in the Editor, with a number of website-objects and with working with CSS-stylesheets. Furthermore we will see how we can make sure the website can be viewed in a webbrowser. In this Tutorial we will not cover the theory behind CSS-stylesheets and how to create one from scratch. For this we refer to the many available tutorials, courses and literature on the Internet.In the end the result of our work will look like the follwing image:

- In the Windows Explorer create in the Futurama directory a new directory called "HelloWorld". This is the directory where our project will be stored.
- Open the Futurama Editor.
- Click on File » New, on
 in the toolbar or press CTRL+N. An object appears in the Document Explorer dubbed 'New Item'. This object is a Document and serves as the starting point for a typical Futurama project. All other objects will be placed beneath the Document.
- Go to the Properties window.
- First we give the document a proper name. Select the property "(Name)" and change 'New Item' to 'Hello World'. It is also possible to do this by doing a right-click on the document and selecting Rename in the appearing context menu. Even faster is simply pressing F2.
- Select the property "PageTitle" and type here 'Hello World' as well.
- Verify that the property "DocType" has the value 'XHTML_1_0'.
- Save this document as "calc.xml" in the directory "HelloWorld".
In the document we will now create the website. To do this we start with a Webpage.
- Select the Design Window and do a rightclick.
- Select New » WebPage. In the Document Explorer you can see that a WebPage 'New Item' has appeard beneath 'Hello World'.
- Rename the WebPage to 'page'.
A WebPage can be divided into several parts by means of using the object WebPanel. Every WebPanel represents a part of the WebPage. The blue and red bars in the picture above are examples of WebPanels. Within a WebPanel other WebPanels can be placed to further divide the space. The whole area between the blue and red WebPanels, for example, is also a single WebPanel in which an additional three WebPanels have been placed: one white and two greens.
- Select 'page', go to the Design Window and select New » WebPanel. Call this one 'upper'.
- In a similar way create in 'page' another WebPanel and call this one 'lower'.
- Select in the Document Explorer or the Design Window the WebPanel 'lower', do a rightclick and select Copy or click on
 .
.
- Select in the Document Explorer the WebPage 'page', do a rightclick and select Paste or click on
 .
.
Beneath 'lower' a new WebPanel 'lower(1)' appears. This is an alternative for creating objects with New » … . Notice that Paste only works in the Document Explorer.
- Rename 'lower(1)' to 'centre'.
WebPanel 'centre' is, however, not yet in it’s proper place, for it should be between 'upper' and 'lower'. In the Design Window we can move objects. Use either the mouse or the buttons  to drag the WebPanel 'centre'. Note that these buttons are only available in the Design Window. The result should now look like below:

- Save the Futurama Document as calc.xml in the directory "HelloWorld", that we created in the beginning.
Calc.xml is the default name for the Futurama Document that will be shown in the Webbrowser. See the page Instellingen in web.config for more information about default names.
- Inside the WebPanel 'centre', create two WebPanels and call them 'left' and 'right'. These WebPanels will be the two green vertical bars.
Now that the framework of WebPanels is in place, the next step is to give each WebPanel a width, height and a color. To do this we make use of Cascading Style Sheets. CSS enables you to define all properties of a website regarding the look-and-feel in a single document. This means you only have to change one single document to alter all pages in a website instead of having to alter all individual pages of the website, reducing the risk that something is missed. Other advantages of CSS are:
- websites will become smaller, because all style-elements are gone;
- website will therefore be faster;
- CSS offers more possibilities than traditional HTML;
- CSS is browser compatible.
As said in the introduction, we will not cover CSS in detail here and refer to the literature or the Internet for more information. In this Tutorial we will make use of a premade CSS-file which you can download here. Save the file as content.css in the directory "HelloWorld" as well. In this file the bachground-colors, heights and widths are defined of the WebPage, the several WebPanels and the WebLabel we will include later.
- Select in Futurama the object 'page' and click at the property "StyleSheet" on
 .
.
- Select the file content.css.
Webobjects like the WebPage and WebPanel have a property "CssClass". Here we can fill in the name of a class in the file content.css. The object then takes the properties defined in that class.
- Select the WebPage 'page', select the property "CssClass" and enter 'page'.
As can be seen in content.css, the class 'page' gives the webpage a width of 959 pixels.
- Give WebPanel 'upper' the CssClass 'upper'.
- Give WebPanel 'centre' the CssClass 'centre'.
- Give WebPanel 'left' the CssClass 'centreleft'.
- Give WebPanel 'right' the CssClass 'centreright'.
- Finally give the WebPanel 'lower' the CssClass 'lower'.
Check in the content.css what the properties are of these classes. We finally would like to add some text on the screen. For this we use the object WebLabel.
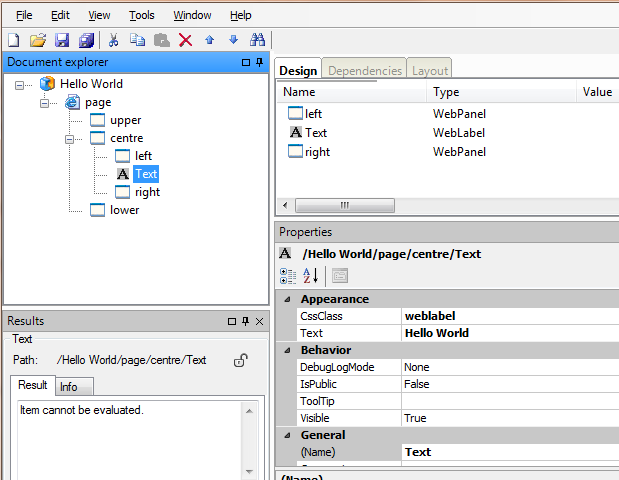
- Select the WebPanel 'centre' and add a WebLabel.
- Call the WebLabel 'Text' and give it the CssClass 'weblabel'.
- For the property "Text" type the text 'Hello World'.
- In the Design Window drag the WebLabel between the WebPanels 'left' and 'right'. The result should now be as follows.
The website is now finished. We need to do one final thing, namely indicating in the Document "Hello World" which WebPage has to be shown first when we open the website. If we would not do this, we’ll get an errormessage "Object reference not set to an instance of an object." when the website is opened in the Webbrowser.
- Select 'Hello World' and click on
 at the property "StartWebPage".
- Select the WebPage 'page' and click OK.
- Save the Document.
Now we would like to see the result.
- Open the Internet Explorer or another webbrowser and type the following URL 'http://localhost/futurama/default.aspx?folder=HelloWorld'. Here "localhost/futurama" and "HelloWorld" are the name and location of the Futurama directory. In your organization the name and/or location can differ. Ask your system administrator for assistence.
A complete example of this exercise can be downloaded here: HelloWorld. Note that this example is created in version 3.2 of Futurama. Opening this example in a newer version of Futurama will prompt Futurama to update the example to the newer version. Click OK when this message appears.