Prerequisites: Futurama Editor Tutorial 1.
Minimum Futurama Version to be used: 3.2
Learning goal: In this exercise we’ll delve deeper into the world of the Futurama objects by introducing Tables and manipulating these with the aid of the available formulas in the Editor. Out of a number of strings and Tables with content we’ll compose a single Table. In this exercise we’ll use some terminology from the 'Pension Universe', but any knowledge of these is not required.
- In the Windows Explorer create in the Futurama directory a new directory called "Tables". This is the directory where our project will be stored.
- Open the Futurama Editor.
- Create a new document and give it the name 'Tables'.
- Save this document as "calc.xml" in the directory "Tables".
- In the Design window do a right-click. Select New » Node. Rename the node 'Input'.
- In the node 'Input' create a Fixed with the name 'Duration' of type Long and give it the value 40 (this is on average the number of years that Dutch build up their retirement pensions).
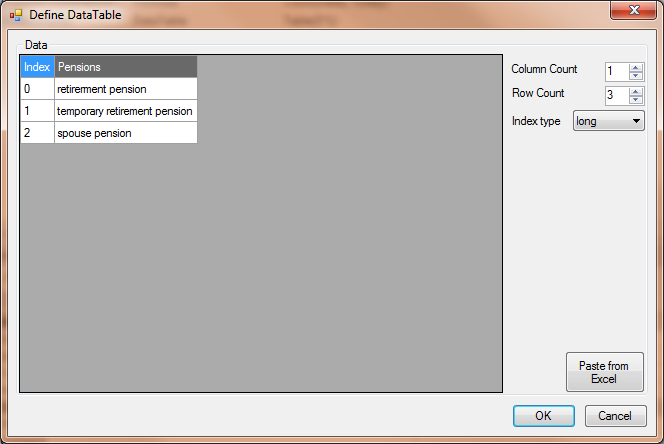
- In the same node create a DataTableof type String and name this Table 'Pensions'.
- Click on the Text property. The following screen will appear:

- Set Column Count to 1, set Row Count to 3 and leave Index type to long. It can now be seen that in the Data screen a column with Header "New1" has appeared as well as three rows with Index 0, 1 en 2. The Column labeled Index is always present and is not counted towards the Column Count.
- Click on "New1" and change this to "Pensions".
- Enter in this column in het first cell "retirement pension", in the second cell "temporary retirement pension" and in the third cell "spouse pension".
Every cell in this table is a Fixed of type String. The screen should now look as stated below.
More information about editing a DataTable can be found here. The next step is to create a table wich contains the present day.
- Create in de node 'Input' another DataTable of type Date and call this one 'Today'.
- Click on the property Text. The Define DataTable screen will appear again.
- Set Column Count and Row Count to 1.
- Rename the Header to 'Today'.
- In the cell create a Formula and click on the button
 .
.
- Select the Formual Date and Time » Now date. This formula returns the present date.
- Click twice on OK. In the Results Window it can now be verified that the column "Today" contains the present day.
We’ll now create another DataTable with some dates. After that the two DataTables will be joined together.
- Create in de node 'Input' another DataTable of type Date and call this one 'Dates'.
- Click on the property Text. The Define DataTable screen will appear.
- Set Column Count to 1 and Row Count to 2.
- Rename the Header to 'Dates'.
In the first cell we are going to make a Formula that increases the present day by the value of the already defined Fixed 'Duration' (=40). This will represent the (fictive) retirement day.
- Select the Formula Date and Time » Date date. This function converts a year, a month and a day to a date.
- Turn the argument Year into a Formula and select Math » Add Long.
For the first number we take the year-part of 'Today'.
- Turn Number1 into a Formula and select Date and Time » Year Long.
The Date that we're going to use as input is the present day as given in the first (and only) element of DataTable 'Today'.
- Turn Date into a Formula and select Tabel » Index Date.
- Define at the argument Table a Reference to the table 'Today'.
- Set arguments Row and Column to 0. This means we want the element in the first row (which has index 0) and the first column (which also has index 0).
- Click on OK. Then click on the Formula-symbol and choose Copy. We will need the same Formula when determining the month and in this way we can save us time. Click on OK once more to return to the Add Formula.
- Define Number2 as a Reference to the Fixed 'Duration' and click on OK to return to the Date Formula.
- Turn the argument Month into a Formula and select Date and Time » Month Long.
At the argument Date we will put the same Index Formula as we have used in Year. Fortunately we have copied this one (if you have not, you can return to the Year and still do it).
- Cllick on the Fixed-symbol and choose Paste. The Index formula will appear. Click on OK.
- Finally set the argument Day to 1. This is because it is quite common practice that retirement starts at the first of the month. Click on OK.
In the second cell we are going to make a Formula that increases the present day by 37 years. This is in many pension schemes the number of years before the temporary retirement pension commences. To save time once again we will copy the Formula in the first cell and alter this.
- Click on the Formula-symbol of the first cell and select Copy.
- Click on the Fixed-symbol of the second cell and select Paste.
- Click on the button
 of the second cell and van de tweede cel en next on the button
  of Year.
- Turn Number2 into a Formula and select Math » Subtract Long.
- Create in argument Number1 a Reference to the Fixed 'Duration'.
- Create in argument Number2 a Fixed with value 3.
- Click on OK thrice. The Define DataTable screen should now look als below:

- Click on OK to return to the Editor.
We are now going to join DataTables 'Today' and 'Dates' with the aid of a dedicated Table Formula.
- Create in de node 'Input' a Formula of type Date and name this one 'Pension commencing dates'.
- Click on the property Text and choose the Formula Table » Join Date.
- For argument Table1 define a Reference to 'Dates' and for argument Table2 a Reference to 'Today'. Click on OK.
In the Result Window we can verify that we have created a Table with three values: the first of the present month 40 years in the future, the first of the present month 37 years in the future and the present day.
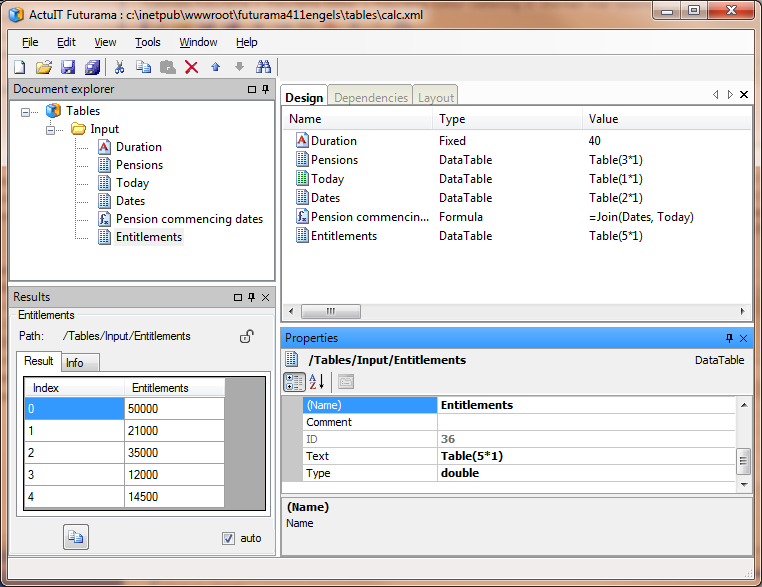
The next step is to make a DataTable with some entitlements for the different types of pensions.
- Create in de node 'Input' a DataTable of type Double and name this one 'Entitlements'.
- Click on the property Text and make a Table with 1 column and 5 rows.
- As values for the elements in the table take 50000, 21000, 35000, 12000 and 14500, although you are free to make up your own numbers.
- Click on OK. The Editor ziet er nu als volgt uit:
The final step is to combine all the created Tables and Formulas into one single Table with 3 rows.
- In the document root 'Tables' create a Formula of type String and name this one 'Result'.
- Select the property Text and choose the Formula Text » Concatenate String.
- Make argument Text1 a Fixed with value "The " (note to include the space!).
- Define argument Text2 as a Reference to the Table 'Pensions'.
- Make argument Text3 a Fixed with value " starting on " (note to include spaces at begin and end!).
- Define argument Text4 as a Formula and select Text » FormatDate String.
- Define argument Date as a Reference to 'Pension commencing dates'.
- Set the argument Format to "dd-MM-yyyy". Click on OK.
- Make argument Text5 a Fixed with value " equals " (note to include spaces at begin and end!).
- Define argument Text6 as a Formula and select Text » FormatNumber String.
- Define argument Number as a Reference to 'Entitlements'.
- Set the argument Format to "€ #,##0.00". Click on OK.
When verifying the result in the Results Window we see a (null) appearing! Something has gone wrong apparently. In this case it is the fact that we have combined Tables with different dimensions. Tables 'Pensions' and 'Pension commencing dates' are of dimension 3 x 1, while 'Entitlements' is of dimension 5 x 1. There are a couple of ways to deal with this. We can alter the Table 'Entitlements' and make it a 3 x 1 Table. Here, however, we are going to use the function Subtable to take a part of the Table 'Entitlements'.
- Return to the Formula in argument Text6. Define the argument Number as a Formula and select Table » Subtable Double.
- Define the argument Table as a Reference to the Table 'Entitlements'. Note that this is the only candidate for it is the only Table of type Double.
- Set Start_row to 0, for we would like to start at the first element of the Table.
- Set End_row to 2, which is the third element.
- Start_column and End_column can retain their value of 0, which indicates the first (and only) column.
- Now click thrice on OK to return to the Editor.
Now we can see in the Results Window the following table appearing:

A complete example of this exercise can be downloaded here: Tables. Note that this example is created in version 3.2 of Futurama. Opening this example in a newer version of Futurama will prompt Futurama to update the example to the newer version. Click OK when this message appears.